Bike geometry explained: stack, reach and how to choose the right bike
Size alone isn't enough: discover how stack, reach and bike geometry affect your position, comfort and how your bike handles.

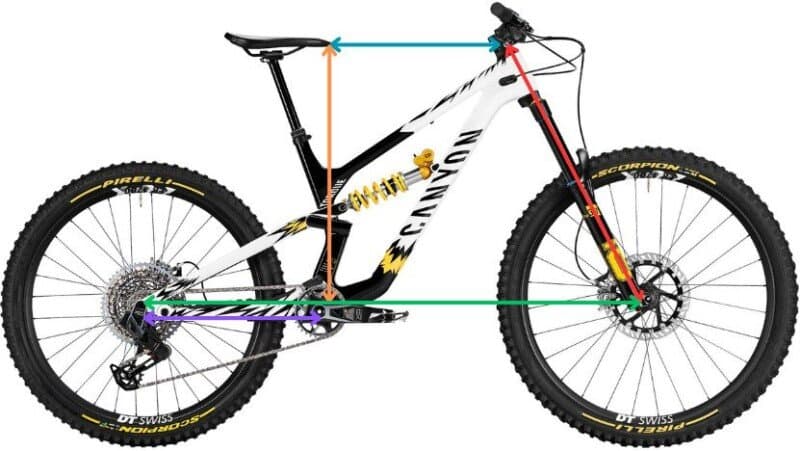
The key is bike geometry. It describes the measurements and angles of the frame and affects everything from your riding position to the bike's stability at high speed. In this guide we explain the main geometry measurements, including stack and reach, and look at how they change between road, gravel, mountain, and city bikes.
Understanding geometry will help you know what to look for when comparing different bikes, especially when buying a used bike that you usually can't test ride before purchase.
What is bike geometry?
Bike geometry is the set of measurements and angles that describe a frame. Every manufacturer publishes this information in a geometry chart, generally for each available size.
Geometry determines much more than simply whether a bike is the right size. It affects your riding position, your comfort after two hours in the saddle, how the bike behaves in corners and at high speeds, and how efficiently you can transfer power to the pedals.
This is especially important when buying a used bike. Components can be replaced. You can change wheels, saddle, handlebar, stem, or drivetrain. Geometry, on the other hand, cannot be changed.
For this reason, geometry is an important feature to evaluate before buying a bike.
It also explains why simply comparing frame sizes is sometimes not enough. Sizes aren't fully standardized: two bikes from different brands, both labeled M, can have different geometries and actual dimensions, partly because manufacturers use different proportions. In addition, within the same brand, different categories and models can be designed with specific geometries.
Instead of just asking "What size is this bike?", it's much more useful to ask: what are its stack and reach?
Stack and reach: the two most important measurements
Among the most useful measurements for understanding a bike's geometry are stack and reach. These values help you understand the frame's dimensions and proportions in more detail, complementing the S, M, L, or XL size label.
What is stack?
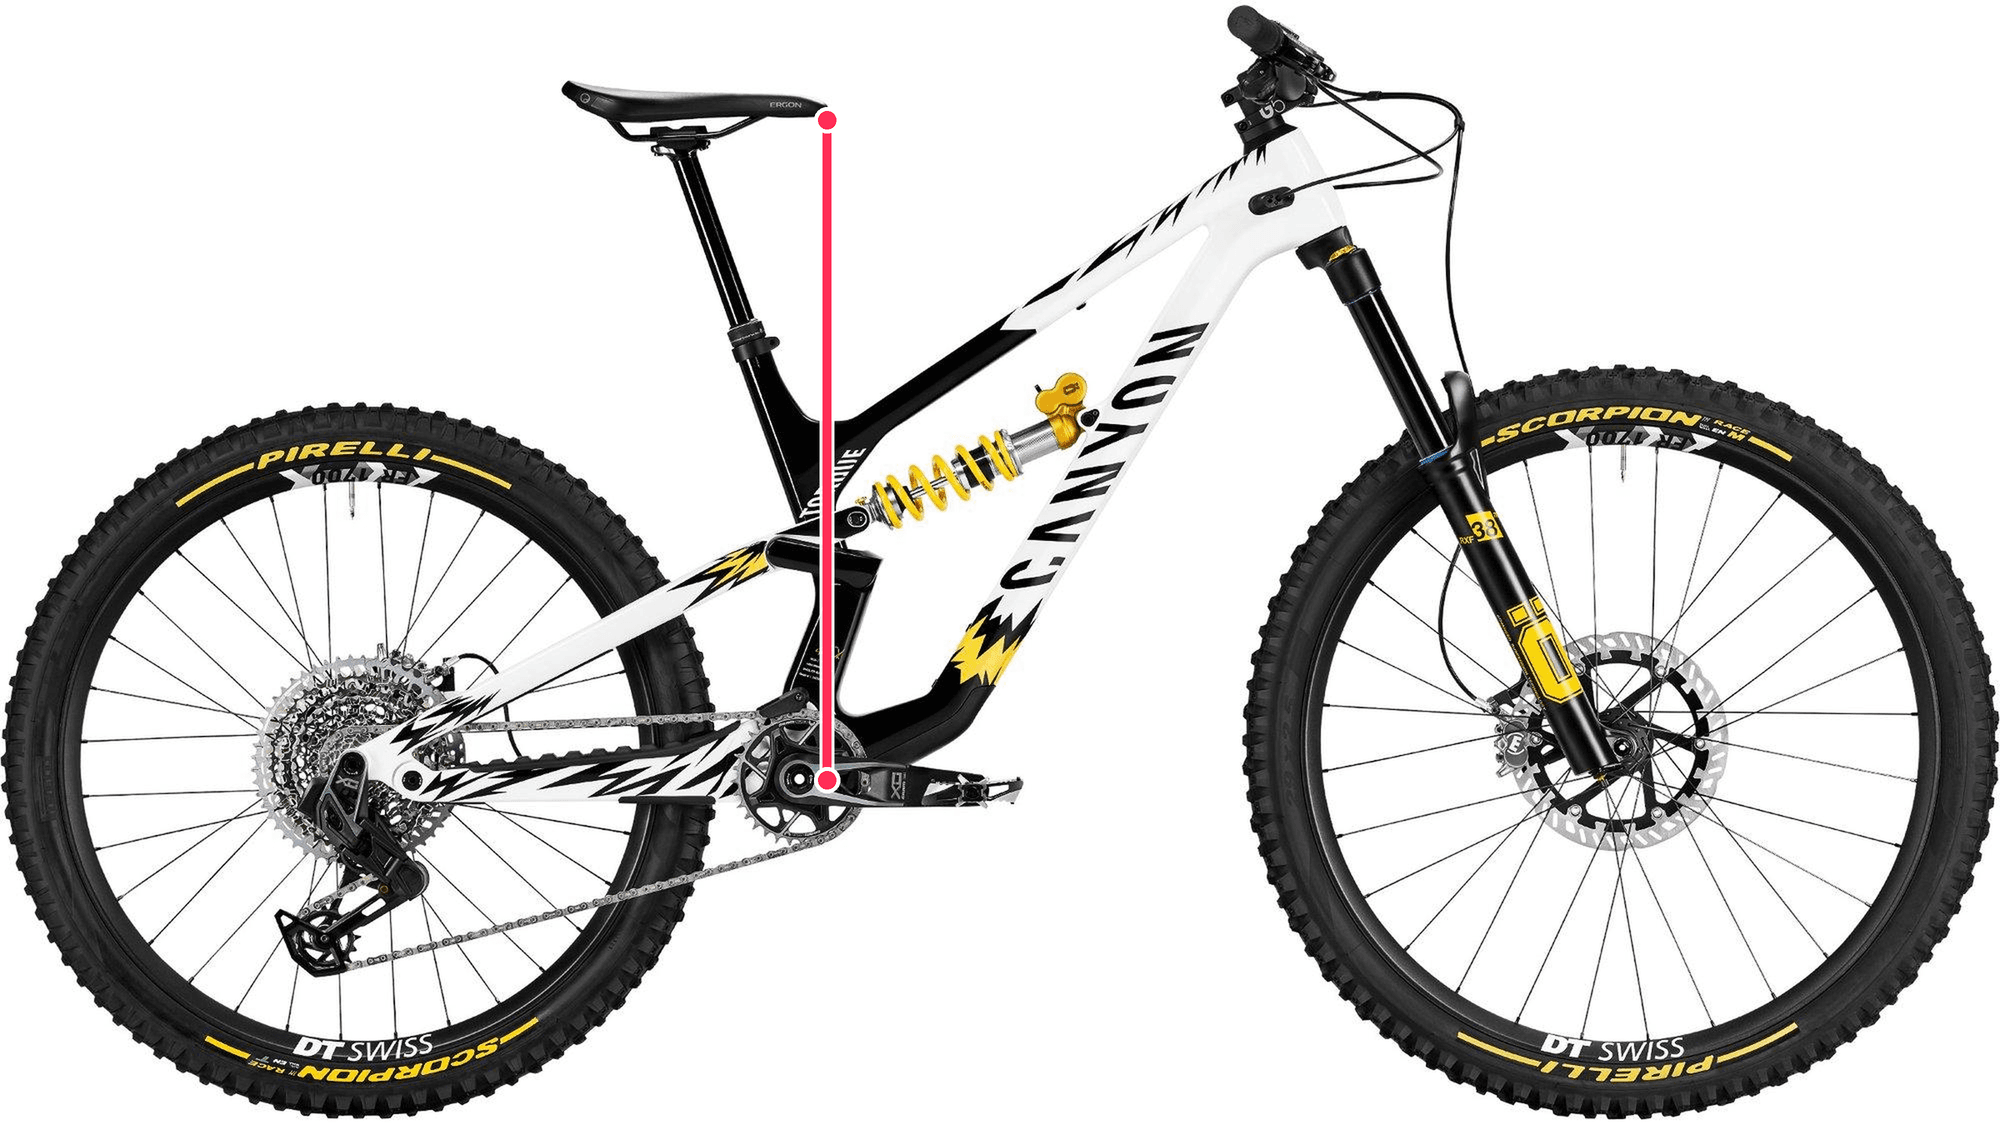
Stack: the vertical distance from the bottom bracket to the top of the head tube.
Stack is the vertical distance from the bottom bracket to the top of the head tube.
In simple terms, it indicates how high the handlebar grips are relative to the pedals.
All else being equal, a greater stack puts the handlebar in a higher position, while a smaller stack places it lower. This affects the rider's position: a greater stack tends to favor a more upright position, while a smaller stack can lead to a lower, more tucked position. The difference is especially clear when comparing bikes designed for different uses: an endurance road bike, for example, tends to have a greater stack than an aero bike. On mountain bikes, a relatively high stack can contribute to a position better suited to riding on steep, technical terrain.
What is reach?
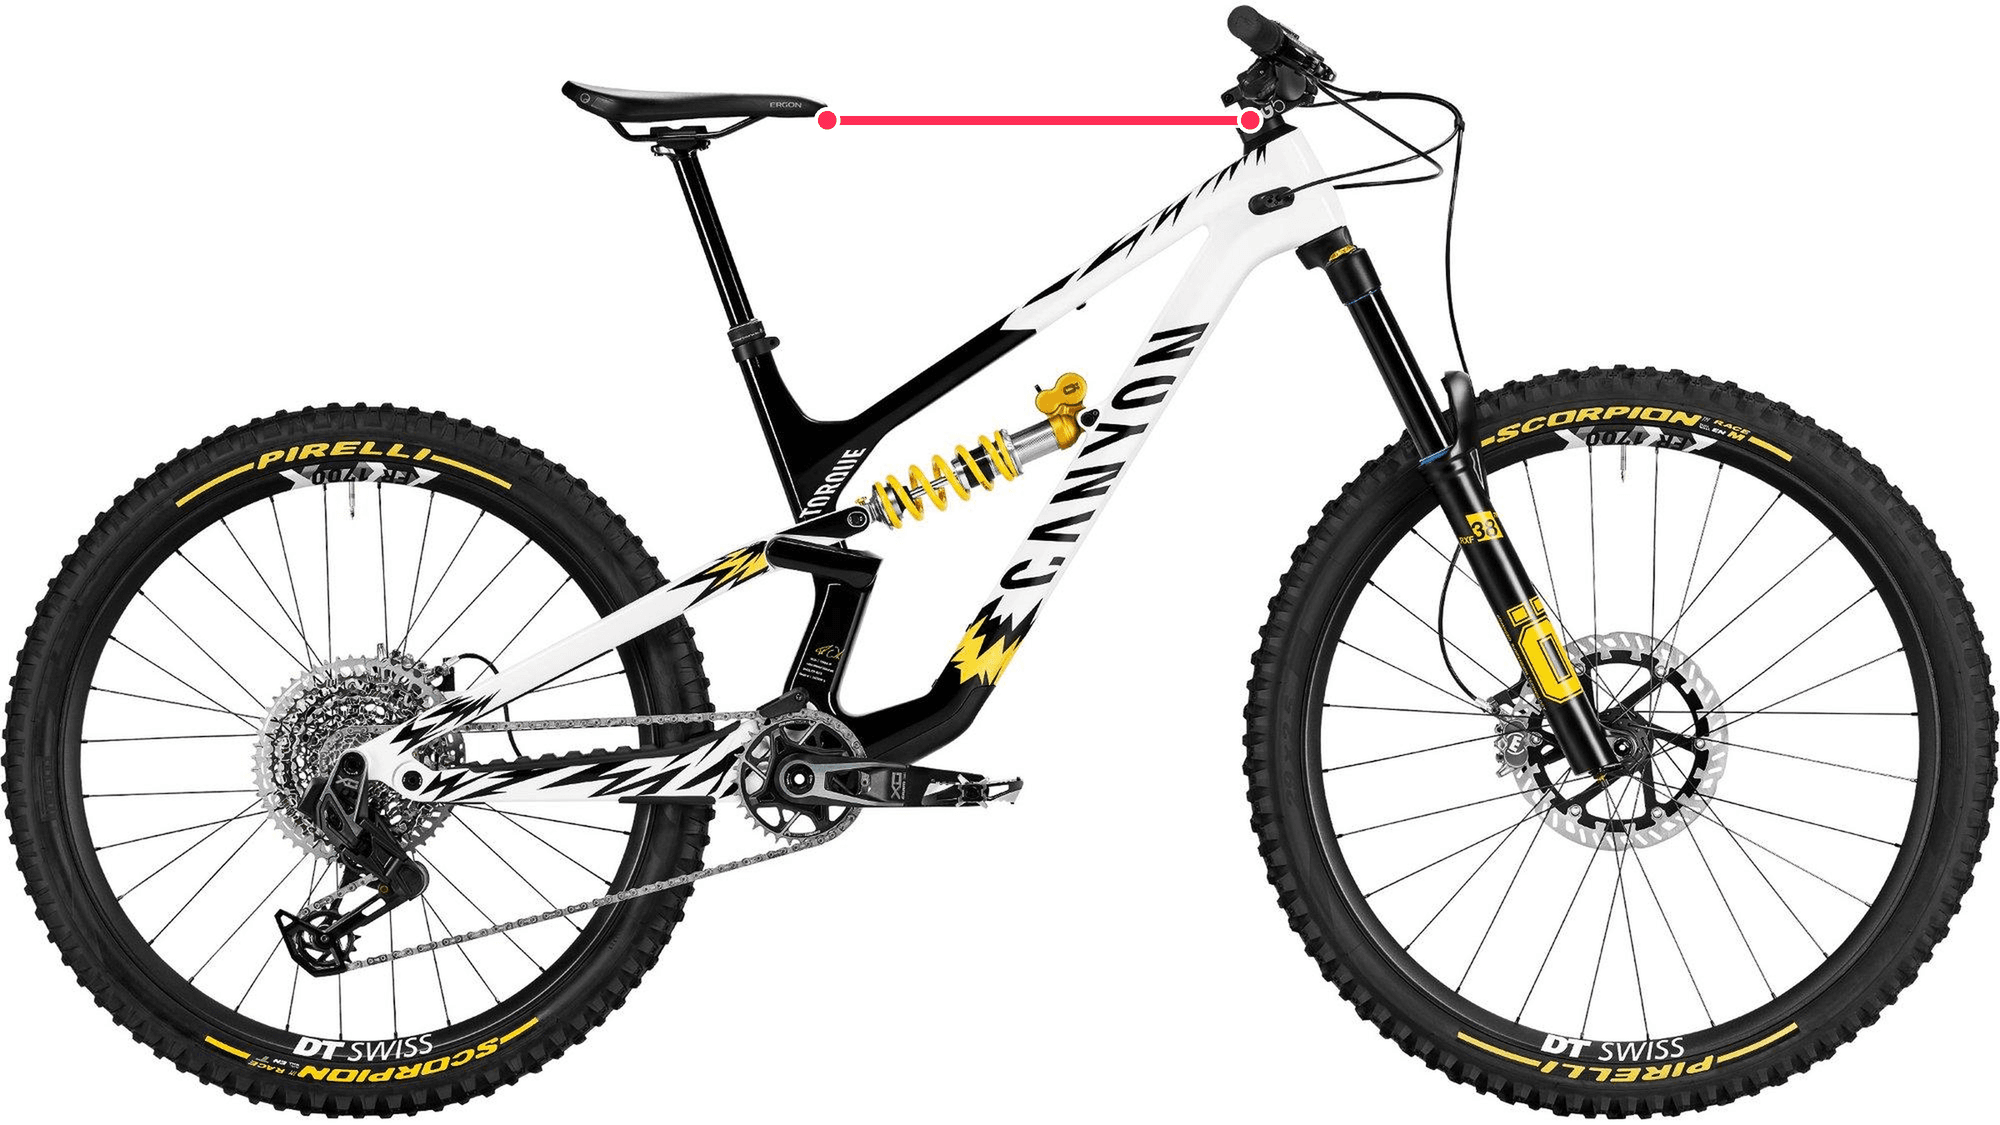
Reach: the horizontal distance from the bottom bracket to the top of the head tube.
Reach is the horizontal distance from the bottom bracket to the top of the head tube.
In simple terms, it indicates how far forward you need to stretch to reach the handlebar.
A longer reach creates a more stretched-out position and generally contributes to stability, especially on mountain bikes.
A shorter reach creates a more compact position instead. It can be easier to handle and more comfortable for those seeking a less aggressive position.
Stack and reach should always be considered together. Looking at reach alone can be misleading, because two frames can have the same reach but very different stack values.
What is the stack-to-reach ratio?
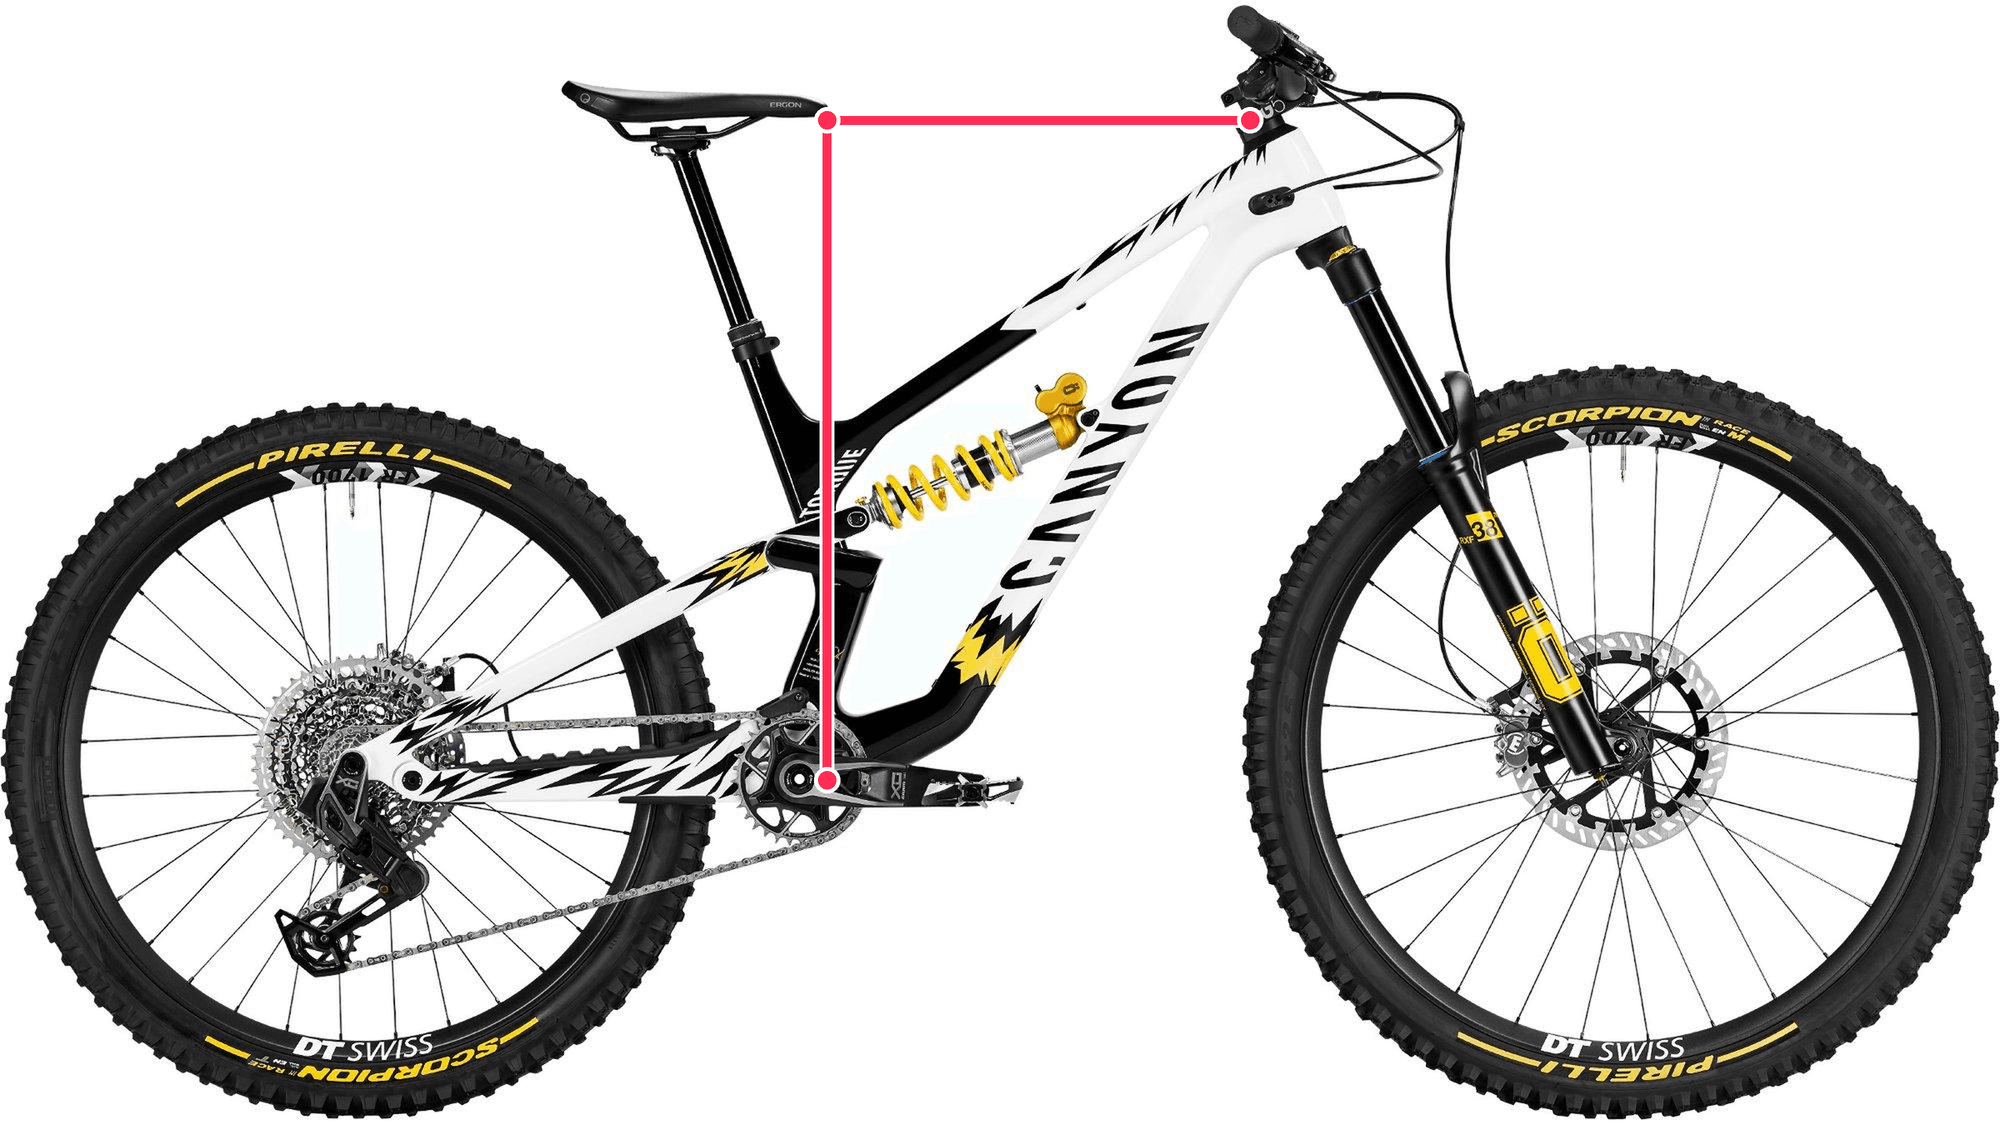
Stack and reach combined: together they describe the height and length of the front of the frame.
The stack-to-reach ratio is calculated by dividing stack by reach.
It provides a quick indication of a frame's overall character:
A higher ratio generally indicates a bike with a more upright, comfort-oriented position.
A lower ratio generally indicates a more sporty, stretched-out position.
A ratio around 1.5 or higher tends toward a more comfortable, upright position.
A ratio around 1.45 or lower tends toward a more aggressive, race-oriented position.
This value is especially useful when comparing bikes from different manufacturers.
Imagine two bikes with completely different size labels. If stack, reach, and the stack-to-reach ratio are similar, their riding position could be surprisingly similar too.
Why have stack and reach become more important reference points than traditional frame measurements?
Traditional frame measurements have become increasingly difficult to compare as bike design has evolved.
Sloping top tubes, in particular, have made the old top tube measurement far less useful for comparing frames. That's why manufacturers increasingly rely on stack and reach, which describe the position of the front of the frame in a much more consistent way.
This means you can compare stack and reach across bikes from different brands and categories.
The practical idea is simple: if you already own a bike that fits you perfectly, look up its stack and reach values. You can use them as a reference when searching for your next bike.
What can you adjust afterward?
Your riding position isn't completely fixed. You can make small adjustments through:
Stem length
Spacers under the stem
Handlebar shape and width
Saddle height
Saddle position
These adjustments offer some flexibility, but they have limits.
A different stem can't turn a frame that's fundamentally too big into the right size frame. Likewise, adding or removing spacers can't fully compensate for a geometry that doesn't suit your body or riding style.
Other bike geometry measurements
Stack and reach are the best starting point, but they aren't the only measurements worth knowing.
Geometry value | What it describes | Larger / more relaxed means | Smaller / steeper means |
|---|---|---|---|
Head tube angle | Slope of the head tube relative to the ground | More stability and control at high speed | Quicker, more agile steering |
Seat tube angle | Rider's position relative to the pedals | More rearward position | More forward position, generally better for climbing |
Top tube length | Length between the head tube area and the seat tube area | More stretched-out position | More compact position |
Seat tube length | Length of the seat tube | Taller frame structure | Lower frame structure |
Head tube length | Length of the head tube | Generally contributes to a higher stack | Generally contributes to a lower stack |
Chainstay length | Distance between the bottom bracket and the rear axle (i.e. where the wheel axle passes, the point around which the wheel rotates) | Greater stability and traction when climbing | Greater agility and a more playful feel |
Wheelbase | Distance between the front axle and the rear axle (i.e. where the wheel axle passes, the point around which the wheel rotates) | Greater stability | Greater agility |
Bottom bracket height / drop | Position of the bottom bracket relative to the axles | More ground clearance | Lower center of gravity and more cornering stability, but more risk of pedal strikes |
Standover height | Clearance between the rider and the top tube | Less clearance available | More clearance and easier mounting/dismounting |
Fork offset and trail | Front-end steering geometry | Changes stability and ride feel | Changes responsiveness and steering feel |
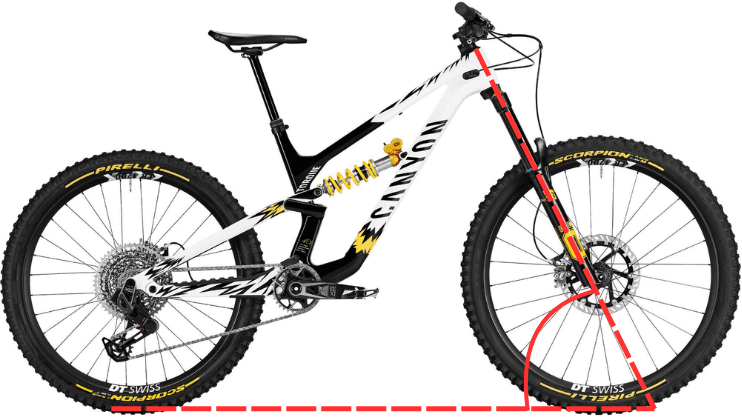
Head tube angle: the slope of the head tube relative to the ground.
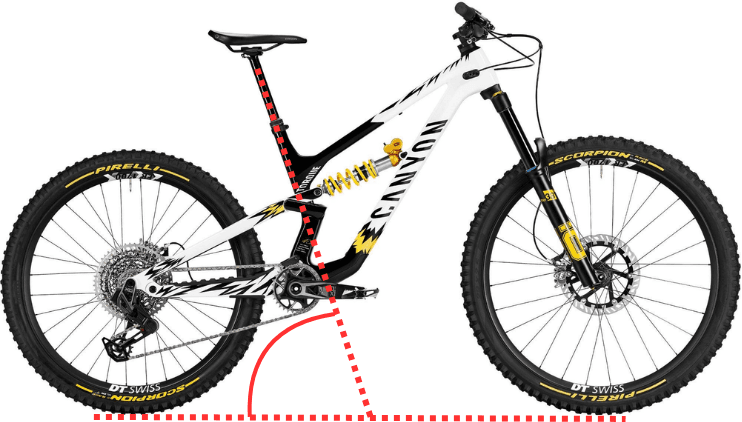
Seat tube angle: the rider's position relative to the pedals.
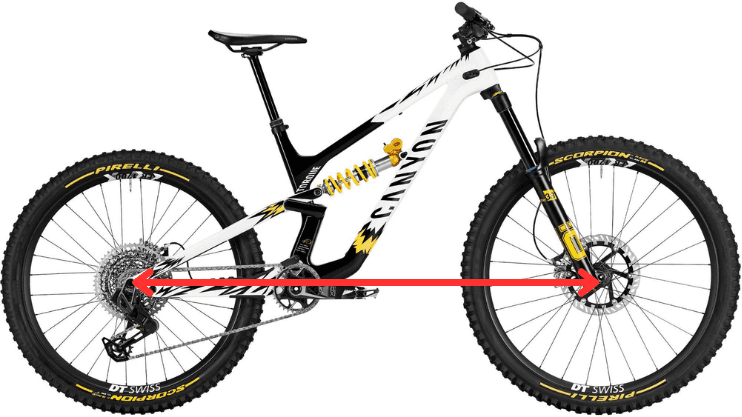
Wheelbase: the distance between the front axle and the rear axle.
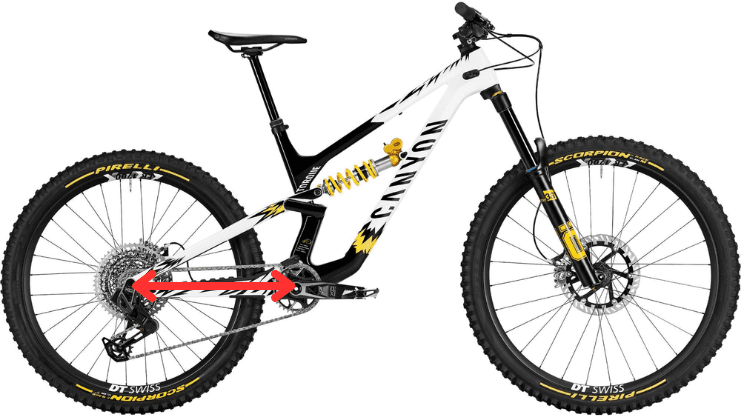
Chainstays: the distance between the bottom bracket and the rear axle.
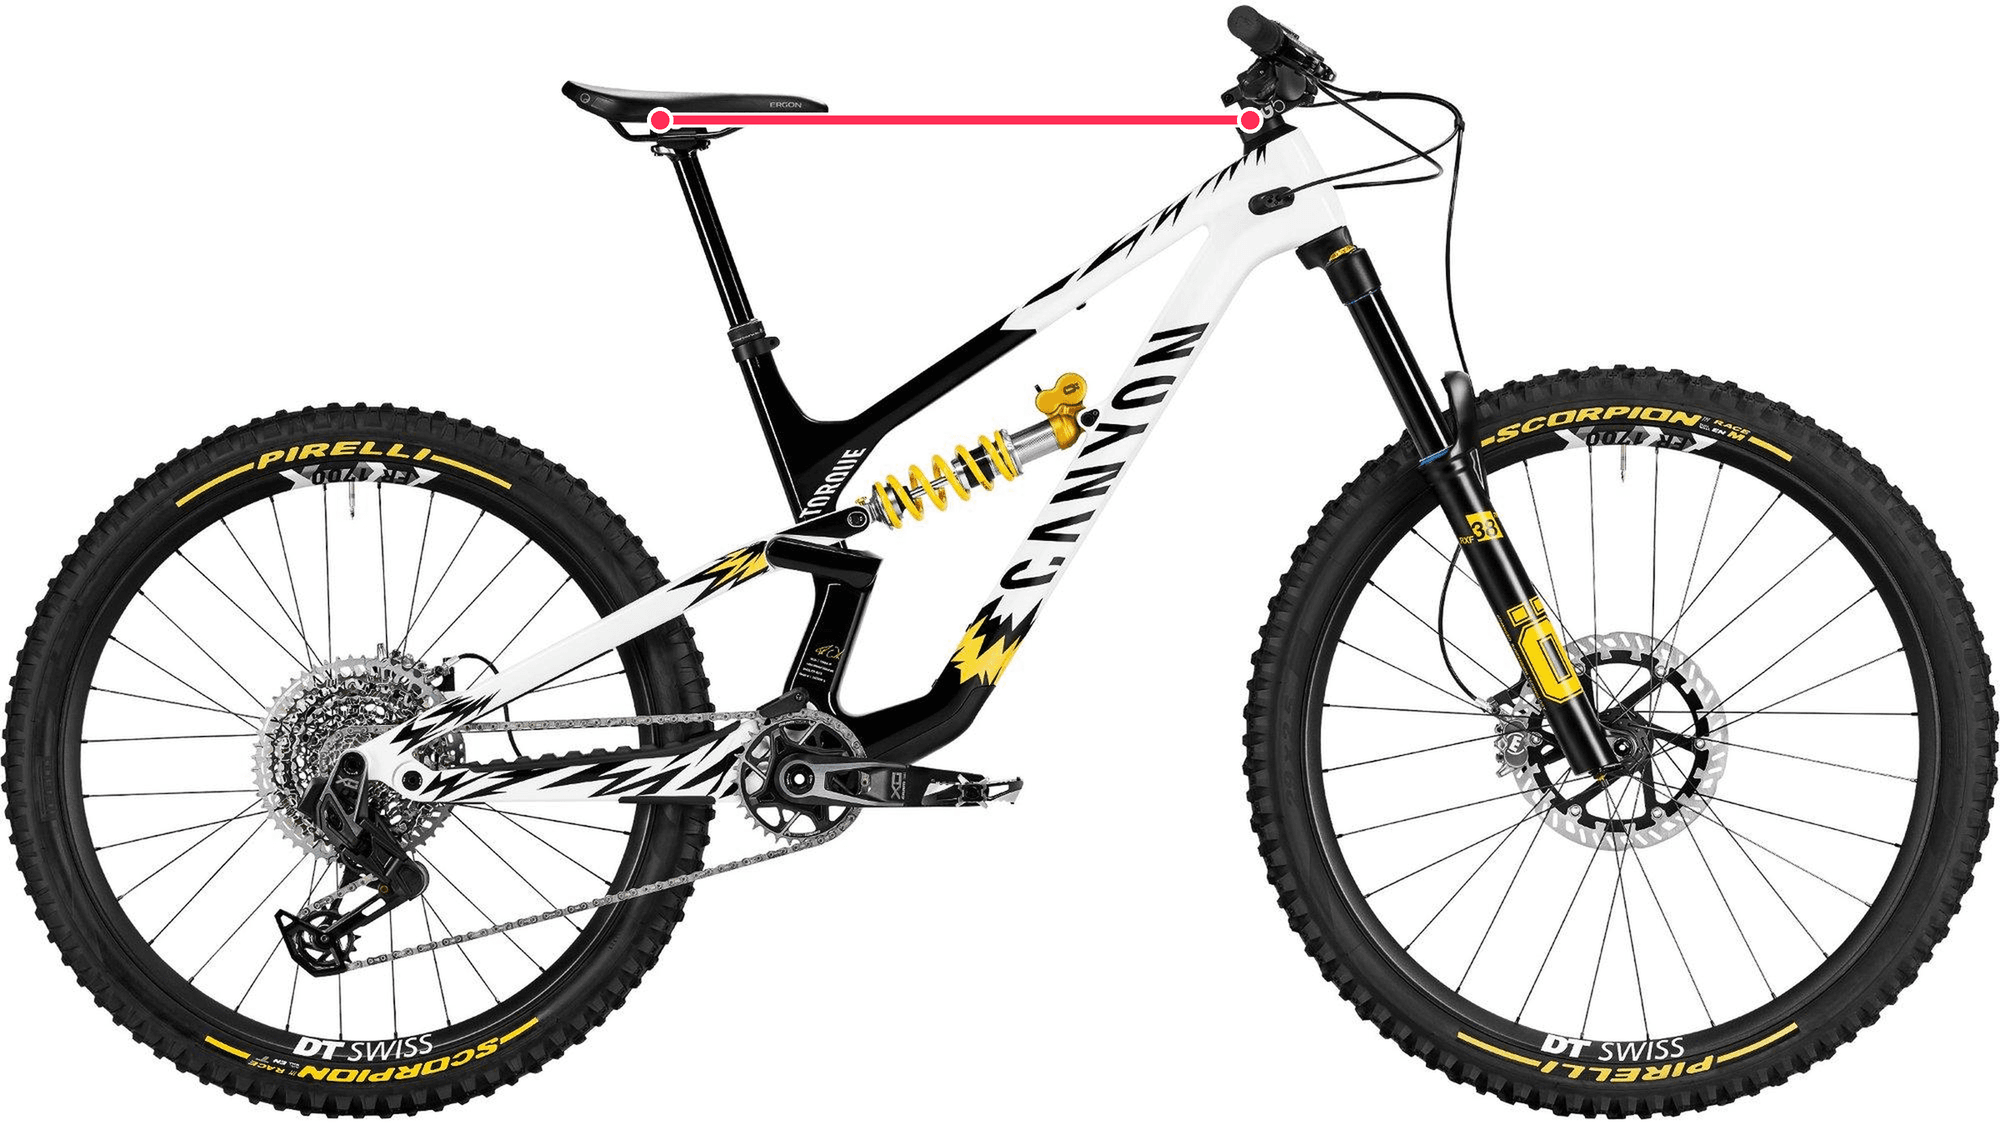
Top tube: the length between the head tube area and the seat tube area.
You don't need to memorize every single measurement before buying a bike. For most riders, stack, reach, wheelbase, head tube angle, and seat tube angle already give a great idea of how a bike will behave.
Fork offset and trail are more advanced details that most buyers can safely explore later on.
Geometry by bike type
Different bikes are designed for different goals.
Bike type | Riding position | Stack | Reach | Head tube angle | Behavior |
|---|---|---|---|---|---|
Road race / aero bikes | Aggressive | Low | Long | Steep | Fast and responsive |
Endurance road bikes | More upright | High | Short | Steep | Stable and comfortable |
Gravel race | Sporty | Medium-low | Medium-long | Medium | Fast and agile |
Gravel adventure | More upright | Medium-high | Medium-long | More relaxed | Stable and controlled |
XC mountain bikes | Sporty | Medium | Medium-long | Steep | Efficient and agile |
Trail / enduro MTBs | Balanced / aggressive | Medium | Long | Relaxed | Stable and confident |
Trekking / city bikes | Upright | High | Short | Steep | Comfortable and stable |
The logic behind this is simple: the more a bike is designed for speed on smooth surfaces, the lower and more stretched-out the position tends to be. The more it's designed for comfort or control on rough terrain, the more upright and stable the position tends to be.
Road bike geometry
Road bike geometry is designed to combine efficiency, speed, control, and rider position. But the term "road bike" covers several categories, from comfortable endurance bikes to aggressive aero and race bikes.
Understanding these differences can make choosing the right road bike much easier.
Endurance bikes: comfortable geometry for long distances
Endurance road bikes are designed for riders who prioritize comfort without wanting to give up the efficiency of a road bike.
They generally feature:
Higher stack
Shorter reach
More upright riding position
More stable handling
More clearance for wider tires
This geometry reduces the need to hold an extremely stretched-out position and makes the bike more comfortable over long distances.
For beginners and those who spend several hours in the saddle, endurance geometry is often the most versatile and forgiving choice.
Examples include the Trek Domane, Specialized Roubaix, Canyon Endurace, Giant Defy, Cannondale Synapse, and Merida Scultura Endurance. For those looking for models specifically for women, the Liv Avail and Canyon Endurace WMN are also interesting examples.
If you're looking for your first road bike, check out our guide to the best road bikes for beginners.
Aero bikes: stretched-out geometry for maximum speed
Aero bikes take a different approach.
Their geometry is generally designed around a lower front end and a more aggressive riding position. The combination of a low stack and a longer reach creates a stretched-out position that helps the rider maintain a more aerodynamic posture.
The benefit is speed. The trade-off is comfort.
This type of geometry requires greater flexibility and can feel uncomfortable if you're not used to an aggressive position. For this reason, an aero bike is rarely the best choice for a beginner.
Some examples are the Canyon Aeroad, Trek Madone, Cervélo S5, Giant Propel, and Merida Reacto.
Race and lightweight bikes: the most versatile sporty option
Race and lightweight bikes sit halfway between endurance and aero.
They generally use a sporty geometry designed for efficient power transfer, responsive handling, and good climbing performance, without focusing exclusively on aerodynamics.
Some examples are the Specialized Tarmac, Canyon Ultimate, Trek Émonda, Scott Addict, and Cannondale SuperSix Evo.
In this category there can be significant geometry differences between brands and models. For this reason, checking the geometry chart is far more useful than relying on the category name alone.
Classic vs. sloping geometry
Older road bikes, especially some steel models, often use classic geometry, characterized by a top tube perfectly parallel to the ground.
Modern bikes instead almost always use a sloping top tube, angled toward the seat tube.
Sloping geometry offers more standover clearance and gives manufacturers more flexibility in producing different sizes. It can also help create a stiff and relatively light front triangle.
This is also why two bikes with the same size label can have very different proportions.
Gravel bike geometry
Gravel bikes sit halfway between road bikes and mountain bikes. Their geometry is designed to combine efficient pedaling with more stability on rough terrain and unpaved surfaces.
Compared to a typical road bike, gravel bikes generally have a more upright position, a longer wheelbase, a more relaxed head tube angle, and a lower bottom bracket.
If you're getting into gravel riding, check out our guide to the best gravel bikes for beginners.
Gravel race: fast and close to a road bike
Gravel race bikes are designed for speed.
Their geometry is generally closer to that of a road bike, with a more aggressive position and handling geared toward speed and responsiveness.
They're ideal for anyone who wants to race gravel or cover mixed roads quickly.
Examples include the Cervélo Áspero, Specialized Crux, Canyon Grail, and 3T Exploro.
Gravel adventure and bikepacking bikes: stable and comfortable
Gravel adventure bikes take a more relaxed approach.
They generally offer:
More upright riding position
Longer, more stable geometry
More tire clearance
More mounting points
Greater stability when carrying bags
This extra stability becomes especially important on long-distance rides or when carrying bikepacking gear.
Models like the Trek Checkpoint, Canyon Grizl, Specialized Diverge, and Giant Revolt are examples of this approach.
For longer adventures, discover our guide on how to choose the best bike for bikepacking.
Mountain bike geometry
Mountain bike geometry has changed radically over the last decade.
The most common way to describe modern MTB design is "longer, lower, and slacker," often referred to as progressive geometry.
Modern mountain bikes generally have a longer reach, slacker head tube angles, and steeper seat tube angles than similar models from ten years ago.
Why?
A longer front end and a slacker head tube angle increase stability and confidence on descents. At the same time, a steeper seat tube angle positions the rider more effectively over the bottom bracket, improving climbing efficiency.
This is especially important when buying a used mountain bike. A model from just a few years ago can have noticeably different geometry compared to a current bike, even if both have similar suspension travel.
Cross-country and race MTB geometry
Cross-country bikes prioritize efficiency.
They generally have steeper angles, less suspension travel, and a position more oriented toward pedaling. They're still designed to handle trails and descents, but generally on less steep, less technical terrain and at more moderate speeds than trail or enduro bikes.
In the MTB world, they're probably the category closest to road bikes in terms of how much importance is placed on pedaling efficiency.
Examples include the Specialized Epic, Canyon Lux, Scott Spark, and Trek Supercaliber.
Trail MTB geometry
Trail bikes are the true all-rounders of the mountain bike world.
Their geometry tries to balance climbing efficiency with descending confidence. They're stable enough to handle technical descents while still being suited to longer rides with plenty of climbing.
For many riders, this makes a trail bike the most versatile MTB category.
Some well-known models are the Trek Fuel EX, Santa Cruz Hightower, Canyon Spectral, and Specialized Stumpjumper.
To see concretely how geometry can vary between different models from the same brand, you can also check out our comparison of the Santa Cruz Bronson, Hightower, Nomad, Megatower, and 5010.
Enduro and downhill geometry
Enduro and downhill bikes push the concept of stability even further.
They generally feature:
Slacker head tube angles
Longer reach
Longer wheelbase
Descent-oriented geometry
This makes the bike extremely stable when tackling steep, technical terrain at high speed.
The trade-off concerns climbing performance. These bikes can feel slower and require more effort when pedaling uphill.
Examples include the Santa Cruz Megatower and Nomad, Canyon Strive, YT Capra, Specialized Enduro, and Propain Tyee.
Hardtail vs. full suspension
Suspension changes how an MTB's geometry behaves on the trail.
When the rider gets on a full-suspension bike, the rear shock compresses under their weight. As the suspension moves through its travel, the linkage movement slightly changes some of the frame's angles and distances. This is also why manufacturers need to account for how the bike sits when it's being used and loaded by the rider, not just the static values shown in the geometry chart.
On a hardtail, on the other hand, the absence of rear suspension eliminates this linkage movement, making the rear geometry more constant while riding.
This is why, on full-suspension bikes, the values shown in the geometry chart should be considered together with how the suspension works: the bike's dynamic setup can actually differ from what you see at rest.
E-MTBs
E-MTBs also have some specific geometry characteristics.
The motor and battery add weight and change the bike's weight distribution. Manufacturers often use longer chainstays and a geometry designed to ensure greater stability.
The result is a bike that can be very stable and controlled, though generally less agile and playful than a traditional, lighter mountain bike.
E-MTBs follow the same geometric principles as traditional MTBs, but the added weight of the motor and battery can influence frame design and weight distribution. For this reason, it's also useful to read e-MTB geometry in the context of the category and intended use.
Trekking, city, and e-city or e-trekking bikes
Not every rider needs an aggressive position.
Trekking and city bikes generally use a high stack, a relatively short reach, an upright riding position, and a fairly long wheelbase. In this case, geometry prioritizes comfort, control, and stability for everyday use.
This combination favors a natural, relaxed position and stable, predictable handling. A reduced standover* height can also make it easier to get on and off the bike, especially during the frequent starts and stops typical of urban riding.
On many bikes of this type, it's also possible to easily adjust the riding position by working on the cockpit. Handlebar height and angle, stem, and other components can offer plenty of adjustment, allowing you to significantly change your posture without changing the bike's basic geometry.
Of course, other categories, like enduro bikes, also allow you to adjust your riding position. The difference is that, on trekking and city bikes, geometry and components are generally designed from the outset to prioritize a comfortable position that's easy to manage and adapt to everyday use.
*Standover: the clearance between the ground and the top of the top tube.
How to find the right geometry for you
Understanding geometry is useful, but the real question is: how do you find the right geometry for your body?
Know your body measurements
Your height is a good starting point, but it's not enough on its own.
Inseam length is just as important, because two people of the same height can have very different leg-to-torso proportions.
You can measure your inseam at home, barefoot and standing against a wall. Place a book between your legs, pushing it up as if you were sitting on a saddle, and measure the distance from the floor to the top of the book.
Use these measurements together with the manufacturer's size chart to identify an initial frame size.
In practice, how to interpret the values
Stack and reach become really useful when you compare them between two bikes.
If, for example, bike A has a stack of 620 mm and bike B has 640 mm, bike B will have a higher front end. All else being equal, it will therefore tend to offer a more upright, relaxed position, while bike A will allow a lower, generally sportier position.
The same goes for reach. If bike A measures 450 mm and bike B measures 470 mm, bike B will have a longer front end and will tend to give a more stretched-out position. Bike A, on the other hand, will feel more compact.
The point, though, isn't to decide whether one value is "better" than the other, but to understand which combination comes closest to the position you're looking for.
If you prefer a more comfortable, upright position, you'll generally look for a relatively higher stack and a shorter reach. If instead you want a more stretched-out, sporty position, you might lean toward a lower stack and a longer reach.
The comparison becomes even more precise if you start from a bike you already know. If you know you feel good on your current bike, you can use its stack and reach values as a reference and immediately understand whether another model will likely be higher, lower, longer, or more compact.
Keep in mind, though, that stack and reach describe the frame, not your final riding position on their own. Stem height and length, handlebar shape, seatpost, and cockpit adjustments can significantly change your riding position.
When is a bike fit worth it?
A professional bike fit can be a worthwhile investment if you ride frequently, spend many hours in the saddle, have persistent issues or discomfort, or are buying an expensive bike.
For a first bike, however, a professional bike fit isn't necessarily essential.
Starting with the correct size and a geometry suited to your riding style will already give you a much better foundation.
Common mistakes when comparing geometry
When comparing different bikes, avoid these common mistakes:
Comparing only sizes instead of stack and reach. A size M isn't the same across every brand.
Looking at reach in isolation. Always consider stack as well.
Ignoring the cockpit. Stem length, spacers, and handlebar can change your position.
Assuming more modern geometry is automatically better. A newer bike isn't necessarily better suited to every use: some older models can have geometries that are still very effective on trails and features similar to more modern bikes.
Buying a frame that's too big, thinking you can fix it with a short stem. Adjustments have limits and can't fully compensate for the wrong size.
FAQ
What does stack mean on a bike?
Stack is the vertical distance from the bottom bracket to the top of the head tube. It indicates how high the front of the bike is and is closely linked to how upright or aggressive your riding position will be.
What does reach mean on a bike?
Reach is the horizontal distance from the bottom bracket to the top of the head tube. It indicates how stretched-out or compact your riding position will be.
What's a good stack-to-reach ratio?
There's no perfect value for everyone, because it depends on the type of bike and the rider. As a general reference, a ratio around 1.5 or higher tends toward a more upright, comfortable position, while a value around 1.45 or lower tends toward a more sporty position.
Are stack and reach more important than frame size?
When comparing different bikes, stack and reach let you dig deeper into the frame's dimensions and proportions beyond the simple S, M, L, or XL label. Size remains a useful starting point, while geometry helps you better understand how the frame is sized and how it can affect your riding position.
How do I find the right geometry based on my height?
Start from your height and inseam length and check the manufacturer's size chart. Then compare stack and reach, ideally with those of a bike you already know suits you.
Can I compensate for the wrong geometry with a different stem?
You can fine-tune your position, but you can't really correct the wrong geometry or size.
Changing the stem, adding or removing spacers, or choosing a different handlebar can help make the position more comfortable or more sporty within a certain range.
The problem arises when these adjustments are used to compensate for significant differences in stack, reach, or frame size. In that case, you risk excessively altering your riding position and, in some cases, the bike's handling as well.
In practice, the cockpit should be used to refine a bike that's already right for you, not to turn an unsuitable frame into the right one.
How does geometry change between road, gravel, and mountain bikes?
Road bikes generally prioritize efficiency and speed, gravel bikes add stability on rough surfaces, while mountain bikes use longer, slacker geometries to offer more control on technical terrain. City and trekking bikes, on the other hand, prioritize a more upright, comfortable position.
What should I check in the geometry of a used bike?
Start with frame size, stack, and reach. Then check the head tube angle, seat tube angle, wheelbase, and chainstay length. Above all, compare the geometry with that of a bike you know suits you and consider whether it's consistent with the type of riding you do.
Conclusion
A bike's geometry can seem complicated at first, but you don't need to know every single measurement to make a better choice.
Start with stack and reach. These two values help you better understand the frame's dimensions and proportions beyond just the size label. Then consider head tube angle, seat tube angle, wheelbase, and chainstay length for an even more detailed picture of the bike's geometry and handling characteristics.
When buying a used bike, it's useful to distinguish between the frame and the components fitted to it. Components may have been replaced or modified over time, while the frame's geometry remains unchanged. That's why, when comparing a used bike, you should check the frame's geometry as well as its components.
The right bike isn't necessarily the newest, lightest, or most expensive one. It's the one with geometry that fits your body, your riding style, and the terrain you actually ride.